
AUDITORIUM AND CLASSROOM TECH SETUP
1. Important Information
Telephone Numbers of Key People:
|
PowerPoint Presentations
It is strongly recommended that PowerPoint presentations be tested at the podium by the tech support person and the presenter in advance of a class, especially if the presentation contains embedded videos. All embedded videos should include the related link in case of problems. In any case, the presenter should email the PowerPoint presentation to the tech support person well in advance of the class.
Presentation materials may be sent to the following addresses:
|
2. Power Up
In the Auditorium, turn on the main switch on the far right of the top of the rack in the equipment closet on the stage, adjacent to the podium. This powers up the mixer and the room speakers.
At any podium, activate the console (small screen to right of monitor) by touching the screen. When the Turn System On button appears, touch it to turn the system on (this will take around two minutes). While waiting, lower the projection screen. In the auditorium the screen controls are on the opposite wall from the podium. Then touch the Turn Projector On button on the console; the projector will take a few seconds to warm up.
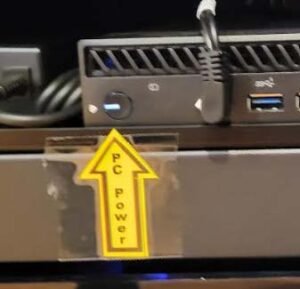 Turn on the podium monitor by hitting the on/off button on the small CPU that is marked with an arrow on the shelf in the base of the podium. A small light next to the button will blink indicating it is on. Then touch the Built-in PC option on the console (for a guest device, pull out the shelf on the podium’s right side and use the appropriate connector).
In the classrooms, touch Turn Monitor On on the console to turn on the side screen.
3. Login to Podium Computer
Slide out the keyboard tray until it clicks, then place the mouse alongside the keyboard. Click the mouse and you should see the Q display on the podium monitor. If not, select Quest ID. If the cursor is on the side screen, move the mouse to the left or right to re-center. When prompted, enter the Password Quest25B.
Locate the presentation in the presentation folder if previously downloaded – look in the Download or Documents folder.
 Alternatively, insert the flash drive containing the presentation file into the USB port located on the left-hand side on the top of the podium. Download the presentation to the computer. Eject the flash drive by clicking on the caret on the right-hand side of the lower toolbar, then clicking on the flash drive icon, pictured at the left. Follow the prompt to safely eject the flash drive.
4. Configure PowerPoint Window
The side monitor(s) must be configured as second monitors that will present different images than the front screen. To do this, press the Windows Key + p simultaneously on the keyboard. Choose Extend from the menu of four choices.Your mouse can extend the cursor to the side monitors like one big screen.
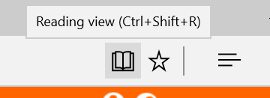 Open the PowerPoint presentation by double clicking on its icon on the desktop. Put PowerPoint on Reading View. The Reading View icon is on the bottom of the page and looks like an open book (see left). This view will have the Windows icons on the bottom.
To present using the full screen, select Slide Show on the top menu bar, but make sure that Use Presenter View is NOT selected.
5. Login to Zoom
 Laptop: Set up on the desk in the front row close to podium. Power on the laptop and check charge level. If the power is low, plug in the charger. Click on the Zoom icon at the bottom of the screen. Click on Join a Meeting and, from the dropdown menu, choose the correct classroom (and year, if specified). Login with the meeting ID number and passcode (which remain the same all semester). They are printed on each laptop and given below. On the laptop, join with No Audio and No Video. Use the following links to log into a class.
| Auditorium Meeting ID: 813 5977 7119 Passcode: 252525 Room 15-17 Room 27 |
At the podium: Minimize the PowerPoint window and click on the Zoom icon at the bottom of the screen. Click Join a Meeting and from the dropdown menu choose the correct classroom. Type the presenter in the Name slot, then click Join. Use the meeting ID and passcode above.
Make sure to select Join with Computer Audio. On the bottom left of the Zoom screen, click Unmute and Start Video.
In the upper right of the Zoom screen, click View and choose Gallery. Using the Zoom menu, click More (on right with three dots) and choose Show Video Panel.
Click on Share Screen (green button at bottom), and choose the panel in which PowerPoint is running. This should be Screen 2 with the desktop, not just the PPT. Be sure to check Share Sound and Optimize for Video Clips at the bottom of the screen, and then click on Share, in the bottom right of the window. You should get a message at top You are screen sharing.
Drag the Zoom window to the side monitors by clicking and holding the left-hand button on the mouse. Maximize the Zoom window on the monitors that should be showing the video panels of you and the at-home participants. You might need to select the grid icon at top. You can maximize the window by dragging the bottom corners and the bottom middle.
Maximize the PowerPoint window.
On the laptop – designate Zoom hosts: click on participants, choose laptop, and select claim host. Next, select the podium and make it the co-host. The person monitoring the laptop should be able to see the presentation and the gallery, and respond to chat messages and alert the presenter if now the presenter can begin the slideshow.there is a question or comment.
Advance slides using the arrow keys on the keyboard or the mouse. On the side monitors, you will be able to see all the Zoom participants’ video panels. Those at home should see the presentation and a video panel of you.
6. Set Up Speakers and Microphones (Auditorium)
Turn on the main switch at the top of the rack in the equipment closet on the stage, adjacent to the podium. This switch powers up the mixer and the room speakers through which all audio will be played.
Turn on the podium microphone by pressing the small button in the base of the stem. The presenter will need to stand close to this microphone.
There are three external wireless microphones in the the drawer in the rack of the equipment closet for use as roving classroom mics, necessary for in-person attendees to be heard during questions and comments periods. Normally, one mic is sufficient. It can be powered up at the beginning of the class and left on during the presentation, ready for use at any time. Someone must be assigned to carry the device to each person as class members offer questions or comments.
7. Power Down
At the end of class, end the zoom meeting and close the PowerPoint.
After the last class of the day, turn off the podium as follows:
|
8. Helpful Hints
|
Revised – 10/15/2023